Tuesday, January 22, 2013

Available ID Card Holder~~


Assalamualaikum U'all~~~

Ni je stock yang fia ade.. ade sape2 berminat tak?? 

~ Each Design have different ~
Material: PVC (Behind) , Felt (Front), Gross Grain Ribbon, Button 

ONLY RM15 / ID CARD HOLDER.. NORMAL PRICE RM18.. SOOO PLEASE GRABBB!!!!!!!!

BUY TWO (2) or THREE (3) or FOUR (4)  ID CARD HOLDER ~~~
>> FREE POSTAGE

PLEASE LIKE FACEBOOK PAGES

' FIA FELT CRAFT' 

OR EMAIL:  AKIRA_KIMURA86@YAHOO.COM


(SOLD OUT)


(SOLD OUT)


(SOLD OUT)


(SOLD OUT)


Sunday, January 20, 2013

Diy paper Beg~~ Recycle paper


haaaaaaaaaa haaaaaaaaa..
wat pe tu haaaa?? 
heeee.. fia masih down lagi disebab kan seorang yang handle booth yang masih senyap tanpa berita..
alahaiii.... macam2 alasan diberikan kepada crafter yang join booth.. 
sejap kate pi kursus la, tenet xde la, pos opis tutup la, nak nikah la...
So.. kalo nak nikah, nape nak ambil crafter banyak2 kan.. if xde handle by sorang, nape masih nak handle booth.. haiiii.. kesabaran kene tinggi~~ 

Haaaa.. jom kite layan... Paper beg DIY versi fia~~

~~~~~~~~~~~~~ Material ~~~~~~~~~~~~

1. Paper Recycle 
2. Gunting
3. Gam 
4. Pembaris 
5. Doily Paper 
6. Deco aka Bunga2.. 

~~~~~~~~~~~~~~First step~~~~~~~~~~~~~~~~

Wokey, kite start dengan recycle paper... kalo boleh cari paper yang tidak mudah koyak aka paper majalah ke, paper peta ke.. heeee fia gunakan paper map.. dok selongkar terjumpa map neh.. so jadi mangsa la~~ hahahaha 

wokey, fia ukuruan depends pada korang nak besa ke kecik... heeee fia ikut size doily paper.. heeee next, korang lipat pada 3 bahagian... heeee... contoh macam dalam gambar bawah nun ni haaa... kuikui 


~~~~~~~~~~~~~~~~~~~~ Second Step~~~~~~~~~~~~~~~

Nextttt ~~~ pas lipat, kite gam~~ kasi lekat~~


~~~~~~~~~~~~~~~~~~~~~ Third Step ~~~~~~~~~~~~~~~~~

Hokeyyy, pastu lipat bahagian ujung... fia lipat dalam around 5cm gitu... 
kite nak base paper beg..


~~~~~~~~~~~~~~~~~ Fourth Step~~~~~~~~~~~~~~~~~

next, korang lipat bentukkan segitiga, wokey dah lipat kan.. 
pastu lipat kan lagi.. refer picture seterusnya.. make sure bersentuhan yer.. pastu gam.. heeee.. sooo.. base paper beg akan muncul~~~


~~~~~~~~~~~~~~~~~~~ Five Step ~~~~~~~~~~~~~~~~~

Taraaaaa... base dah ade~~~ 


~~~~~~~~~~~~~~~ Six Step ~~~~~~~~~~~~~~~

Taraaaa~~~ dah siap dah paper beg Diy~~ 
comel tak?? So, kite deco2 dengan Doily paper.. haaaaaaaa
kan nampak cute... heeeeee kan kan?? 


Nak lagi cun???
Letak je Bunga2, Ribbon Bow ke... kompom cunnnnnnnnnnnnn~~~~


~~~~~~~~~~~~~~~~~~ Kesimpulan~~~~~~~~~~~~~~~~~~~~

jimat yang utama.. sebab pakai bahan recycle... iaitu paper majalah ke, paper guide ktm ke.. make sure paper yang tahan & tidak mudah koyak..

Second, rase puas bile buat diy kan?? op kosssss ~~~

Okey... selamat mencuba u'all~~~


Wednesday, January 16, 2013

Demmm! Giler Lantern & Paper fan


Jommmmm bercerita~~

Ni kes nak naik kan mood ber`craft yang dah lame terhenti~~ 
ramai gak yang request~ id card holder, headband, pillow.. 
Material untuk id card holder xde restock lagi~~ button cun2 pun dah nak abis~~ 
So.. kene tunggu gaji la gamak yer nak topup ape yang habis.. 
Ni pun tengah agak down~ sebab xde dpt2 ape lagi hasil yang fia hantar ke kedah.. 
Ramai gak crafter yang tensen sebab xde update ape2... 
little down ckit la... seb bek la fia ni jenis yang tak cepat melenting.. but kalo dah lame sabar 
ade gak la tergunung berapi~~ 
uwaaaaaaa~~ udey la bulan nie agak kering seperti padang terkukur.. nak makan pun kene bajet.. nak isi dilova lagi.. seb bek tempat keje & umah 2 kilometer je... xde tol.. hahaha juz sabtu & ahad je lalu jauh ikut anjung depan UPM.. seb bek makan kat serdang masih murah & lazatttt ~~ 

hahahaha 


~~~~~~~~~~~ Jom cerita Lantern & paper fan ~~~~~~~~~~~


Holaaaaaaaaaaaaaaaa ~~ 
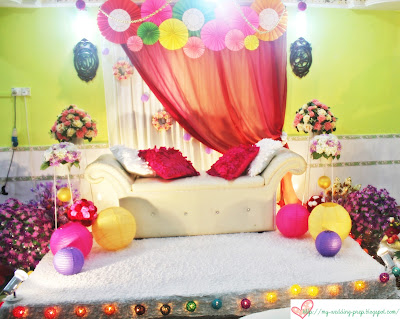
Entry untuk hari ini, pasal pelamin yang menggunakan Lantern & paper fan.. 
Soooo Gojes sangat2... abis la.. bukan ape, if pelamin penuh dengan flower agak serabut kan..
if kene dengan warna bunga & susunan mesti Meletoppp punye~~ 
sekarang kan trend, pelamin yang bunga - bunga besar kan? 
Heee untuk pandangan fia, tetap nak pilih Lantern & paper fan~~ 
Simple & make sure combination colour of paper fan & lantern yang warna-warni ~~ 
Ahakkkkkssss ~~ 

Ohhh ~~ Lantern ~~ Lantern~~ boleh ke berseri di kawasan sawah yang lapang?? 
Pasang je niat dulu ~~ tak salah kan?? 


Source: http://www.jumiesamsudin.com
Memang gojes sanggggatttt pelamin nie~~ kannnnn??? 


source: en. google yang gojes~
Haaaaa.. memang fanatik giler with paper fan... memang cantik & gojes !!!!


source:http://my-wedding-prep.blogspot.com/2012/09/aku-suke-pelamin-ku.html
Seee.. Diy pelamin pun boleh jadi cantik kan?? Saving lagi tu.. heeee 


source: Cik adik google
Perghhhhhhh~~~ memang gojes lantern di malam hari.. sambil ditemani bunga2 yang berjurai2.. heee


Source: adik Google..
If rajin.. boleh deco2 kan lantern yang kosong nie kan?? juz beli rama2 kat kedai bunga or jahit.. pastu tampalkan je.. xpun punch je paper berbentuk butterfly... haaaaaaaaa 


Source: abg google~~
Haaaaaaaaaa.. yang tampal je ngan doily paper... kan doily paper macam2 design... 
Sooo.. nampak gojes bile dah pasang lampu~~ 


~~~~~~~~~~~~~~ Kesimpulan yer ~~~~~~~~~~~~~

Pelamin with paper fan & lantern memang gojes~~ 
Ahaaaakkkksss.. kang tak pasal2 penuh sawah dengan lantern..
hahahhaa.. pasang je dulu impian~~

kene pasang strategi dari sekarang.. hahahahaa 
harap2 la menjadikan... hahahaha 

~Peace~

Tuesday, January 15, 2013

Banjaran Buatan ~~


Haiyaaaaa~~~

ade ke banjaran buatan??? xpe2.. jom kite review balik Geografi mase belajar dulu - dulu mengenai banjaran gunung yang terdapat di semenanjung~~~


Source: http://panitiageografisglong.blogspot.com

Manakala Banjaran Gunung yang terpanjang di Malaysia ialah Banjaran Titiwangsa yang dikenali sebagai Banjaran Besar merupakan tulang belakang semenanjung Malaysia.  Gunung yang tertinggi di Banjaran ini ialah Gunung Korbu.  Terdapat 3 kawasan peranginan utama di kawasan ini iaitu, Tanah Tinggi Cameron, Tanah Tinggi Genting dan Bukit Fraser.

Gunung yang tertinggi di Semenanjung Malaysia ialah Gunung Tahan yang terletak di Banjaran Tahan.  Di sini terdapat Taman Negara yang tertua di dunia yang kaya dengan pelbagai flora dan fauna Hutan Hujan Tropika.


V
V
V
V
V
V
V
V
V
V
V
V
V
V
V
V
V
V
V
V
V
V
V
V
V
V
V
V
V
V
V
V
V
V
V
V
V
V


~~~~~~~~ Banjaran Hang jebat ~~~~~~~~~


hahahaha.. ni la Banjaran Hang Jebat daripada pandangan atas... 
Ni kalo kutu lalu, kompom laju meluncur... hahahaa 
tapi xpe... xsempat pun kutu nak lalu... dah kene serang ngan ubat kutu 'spot on' ~~

Peace!!! 

Doily Paper oh Doily Paper


Taraaaaaaaaaaaaaaa!!!

Makin menjadi - jadi plak fia neh... udey jatuh cinta with Doily paper plak... 

dulu ingat Doily paper untuk buat alas kek, beskot, bauhulu ke, 
yang jual kek sepotong tu ke.. 

Tapi.. uper2 yer leh buat macam - macam kat Doily paper neh... heeeee


~~~~~~~~~ Sesi temu ramah Doily Paper~~~~~~~~


macam mana rupe Doily paper ni?? 


source : en. Google yang Mantop~~~

okey biasa u'all akan jumpe Doily paper warna puteh kan?? 


Doily paper sekarang boleh jumpe dengan macam2 kaler.... wahhhhhhhh makin meriah la 
Doily Paper kan.. Doily paper warna warni fia terjumpe di 


siap boleh DIY lagi ~~~ Jom refer step by step juneberry-lane.blogspot.com

~ A bowl or baking dish (I used a Pyrex baking dish)
~ White paper doilies (found at Michael's or Jo Anne's)

~ Food coloring ~ Ooo.. Boleh pakai pewarna yang buat kek2 tu... heeee 
~ Paper towels
~ Rubber gloves


1.) Fill the baking pan or bowl with only enough water to cover the doilies – this is key, because you need the food coloring to be very concentrated. You will need to use quite a lot of food coloring. My first two or three attempts were failures (I had too much water in my dish and not enough food coloring). After I dumped out most of the water, and really poured in a lot of dye, it worked nicely.

2.) Submerge the doily in the dish/bowl for a few seconds (10 or 15 seconds is sufficient). I started to get bolder toward the end of this craft and I left them in for longer, just to see.

3.) Gently take them out of the dish and lay them on a paper towel to dry. They are very fragile, so use caution when you take them out of the pan.

4.) Blot them dry right away with another paper towel very gently. Set aside to dry. (I laid mine out on a table, underneath a ceiling fan, and they dried very quickly).

If you don’t want your fingers to turn green or blue or purple, like mine did, use rubber gloves to take the doilies out of the dye. Also, this craft is a paper towel hog; you will want to have lots of paper towels handy.

This is definitely a kid friendly activity, except it might take kids (depending on how old they are) a couple of tries to get the doily out of the dye without tearing it.


~~~~~~~~~~~~~~Hasil - hasil kecomelan Doily Paper ~~~~~~~~~~~~~~~


Source: Puan Google yang Gojes~~
Seeee Boleh transform jadi bunga kan... bunga telur pun boleh.. bunga pahar pun boleh~~ 


Doily paper boleh gantung2~~ gantung kat khemah ke, gantung kat backdrop pelamin ke.. kuikui


Doily paper boleh letak kat kad~~ print je kad.. paper pakai glossy yang tebal ckit.. pastu tampal je doily paper.. hohoho soooo nice... boleh buat diy kad sendiri... ~~


Source: Puan Google yang Gojes~~
Seeee Boleh transform jadi lampu ~~ so nice tak???? 


Source: Puan Google yang Gojes~~
Doily paper pun boleh letak kat brown paper... sekarang tengah trend brown paper as a doorgift.. heeeee 


~~~~~~~~~~~~ Kesimpulan si Doily Paper~~~~~~~~~~


Hoyehhhhhhhh~~~ Doily paper Best!!!! 
Fia dah terpikat dengan Doily paper dah.. haiya... Doily paper mesti masuk dalam list gak nie.. heee 

Best kan kalo sesuatu yang dihasilkan amat cantik & puas sebab DIY sendiri.. 
sooo... u'all akan terasa terharu nanti bile orang..

'eh comel yer doorgift nie..' 
'alamak... cantik giler kad kawen hang'
'Fuiyoooo.. rajin betul tampal2 & gunting Doily paper' 

heeeeeeeeeeeee.. sekarang ni bergantung pada diri sendiri..
~~Bersemangat & Sabar untuk hasilkan sesuatu~~ 

Regards~ Fia (^_^)


Lantern Oh Lantern


As salam u'all ~~ 

ari ni fia nak buat entry pasal 'Lantern' aka Tanglung ~~ 

sebab ape?? lantern tu comel & Gojes & Gojes tersangat2~~ heeee 

So, fia pun jelajah la kat pesbooking.. terjumpa plak page ni 


Paper-Lantern-N-Boxes


Memang terus tertarik ngan Lantern~~ arghhhhhh pastu de Lantern Polkadot


Toink2~~~ dalam kepala fia muncul mcm2 dah kerana Lantern bola - bola neh ~~ 


More ideas, fia terus menjelajah and taraaaa!!!!
terjumpe tentang  

'Doily Lantern' 


Seeee.. memang Gojes sangat2 Doily Lantern nie!!!! 

U'all boleh try & DIY ~~ 


The material ~~~


Materials:
  • 4-5 doilies per lamp (preferably round and about 5-6 inches in diameter, depending on the size you want the orb to be. 
  • Fabric stiffener (can be found at craft stores)
  • Old paintbrushes (a wide flat brush, or a medium round brush will work the best)
  • Various sized cheap rubber balls, balloons, etc. (I found small rubber balls at the dollar store, but balloons might be a cheaper option if you are going to be making more than a few orbs. You will need one for each lamp you decide to make as you have to pop them to remove them.)
  • Wax paper or palate paper
  • A bowl or dish to rest the orb on while you work on it
  • Flameless LED tea lights, one per orb (Don’t use real candles! 


***Before you start, make sure to wash your doilies by hand with a mild soap and lukewarm water in the sink. Lay flat to dry. If you want to change colors, you can dye them using fabric dyes, or for a more delicate color change, use tea. Brew up a strong cup of tea and let the doilies sit in it for a few hours. This will give them an antique finish and will hide any stubborn stains on vintage doilies. If you want your orbs to be white, soak the doilies in a diluted bleach bath for an hour, then rinse thoroughly to prevent damaging the delicate fibers. Doilies must be completely dry before you begin making the orbs. Now on to the fun!
Step 1: Take your rubber ball or balloon and place it in a small dish to keep it steady while you work. Put a piece of wax paper underneath the ball to protect the dish. Begin placing the doilies on the ball, making sure the edges slightly overlap. This is what will keep the orb together after the fabric stiffener dries. You can add a few stitches to reinforce the seams once it is dry (especially if yours will be handled a lot), but I didn’t find it necessary.
Step 2: Once you have the doilies arranged how you want them, pour some fabric stiffener onto the palate or wax paper. Start painting the fabric stiffener onto the doily, ensuring you cover every bit, otherwise it won’t harden and the uncoated parts will sag. Don’t oversaturate, just put enough on so that it is damp to the touch.
Step 3: Leave a small area open so that you can insert the LED tea light.
Step 4: Let the doilies dry overnight to ensure that it is COMPLETELY dry before handling. Side note: I got overexcited and tried to remove my doilies from the ball before it was completely dry, and ended up with a soggy, misshapen doily mess.
Step 5: Once the doilies are dry, use a blade to pop the balloon/rubber ball. Carefully pull the ball out through the hole you left open in the doilies. Ta da! You now have a ready to use doily lamp!
Optional Step 6: If you want to make the pomander version of the lamp, simply attach a pretty ribbon to the opening where you put the tea light in. This makes it into a sort of basket that will hold the candle and the bow will hide the opening. I just pinned my ribbon on, but you can sew or hot glue it for a more permanent attachment.


Tadaaaaa!!!! 

memang Gojes sangat Doily Lantern ni!!! 

Fia harap sangat sempat buat DIY Doily Lantern ni~~ dalam list gak nie.. heeee


~~ ape macam.. memang comel & cute kan pasal Lantern nie..
dulu2 ingat lantern ni untuk Chinese New year je..
Tapi sekarang... dah boleh buat untuk deco2 untuk sesuatu Majlis... 
Memang cantik sekali... kompom pas abis majlis, mesti de makcik2 or pakcik2 nak
request bawa balik lantern kan... kuikui 

okey.. setakat nie je review fia tentang lantern... nanti fia cite lagi pasal lantern nie..

Ohhhh... Lantern idaman harap2 dapat dilaksanakan nanti~~ tetttttttttttt